Butler's Orchard

Sunday, October 23, 2011 - Posted by Jullie at 10:04 PM
Every season there's always a must-do activity planned. For example;

winter: sight see amazing Christmas decorations, complain about the cold, forgetting to get my car waxed before the snow/ice (as you can tell winter is not my favorite season).

spring: visit DC to see cherry blossoms on the tidal basin
summer: beach trips, carnival/fair, outdoor movie festivals
fall: explore fall foliage either in the Shenandoah, Old town Alexandria, somewhere on the GW parkway, and of course visit the pumpkin patch!!!!

Over the weekend, Mr. Rhee and I along with our close friends the Lee's visited Butler's Orchard for their annual Pumpkin Festival! I think little E enjoyed the petting zoo part, while we enjoyed the corn maze and the pumpkin cannon!


Eugene showing off his throwing skills


Feeding the goats


Little E staring at the sheep


Yay for not getting lost in the corn maze!

My favorite thing to do, is shooting pumpkins out of the cannon. Surprisingly, when it was my turn, the pumpkin Mr. Rhee chose for me hit the target that was sitting on top of a van! First one to do it all day apparently. The best part was when the target got knocked down, I of course screamed in excitment... it made my day.. no week! =)

Before we left, we had to stop by the market to see all the goodies on sale. I ended up buying a few more mini pumpkins.... to glitter later that day =D


Hope all the young adults at church enjoy their hayride/bonfire night at Butler's this weekend! Glitterred pumpkins post coming soon!


Mandu Making Party!

Saturday, October 22, 2011 - Posted by Jullie at 1:17 AM


Mandu (만두) is the Korean word for dumplings, and Koreans sure do know how to make fantastic dumplings. Whenever I think about making them, I always reminisce about my childhood days when women of the family would gather around the table, catching up, talking about their lives, and gossiping. My aunts, mom, and grandma would make hundreds of dumplings! Well, now it's my turn. So I invited some girls in my small group to come over to have a girls night.

First, I premade the filling. The filling has tofu, kimchi, green onions, jjap chae (sweet potato noodles), cooked ground pork, sesame seed oil, salt, pepper to taste.

Before you mix the ingredients together, you have to get rid as much water as possible. So with the tofu and jjap chae noodles, I put them inside a cheese cloth and squeezed the heck out of it. Then, I continued on with mixing the filling to taste.
Then, we all sat around the table, and take the dumpling wrappers and fill them, I personally like the Korean brand called sweet potato wrapper, but you can also use wonton wrappers. We had to make sure not to fill it too much because we have to leave room around the half the outer part of the circle to close the dumpling.

On that outer edge we used our fingers to dip it in a bowl of wisked egg and used it as paste.
If you notice that the dumplings are getting stuck on the table, we floured the surface.


(photo creds to angelica)
You can close the dumplings in pretty shapes, including making cute circle shaped buns, or moon shaped buns. Then we split the batch in half, and steamed them and pan fried the other half.
Before they were cooked

And here's the final product!!


We made so much, when our husbands came back from boys night, we fed them and some guests the next day!
Such a fun and delicious way to get together with some gal pals. I truly enjoy spending fun time crafting, cooking, and talking with all of my girlfriends... I'm truly blessed to have you all in my life =)

-Jullie

Fall Wreath Love

Friday, September 30, 2011 - Posted by Jullie at 5:47 PM
My lovely friend Gina came over on her day off to help me make my next craft project! I love fall colors, and fall weather (except this day we saw no sun...). So I wanted the wreath to represent the loveliness and simplicity of fall.

So here was the process:

I started with a simple wreath I bought at Michael's.. love that store!

Cut felt into these shapes, which Gina thought looked like bear ears

Glue them togther, and add a special girliness on top =)
Love the pearls, gives it a soft effect


There it is the finished product!


We're having too much fun!


On our door!

Maybe my next seasonal purchase would be a pumpkin... glitter pumpkins anyone?? Saw in my Martha Stewart subscription and I HAVE to do it, if hubby doesn't veto =)

Happy crafting everyone!

Love,
Jullie

goodbye summer nights... hello fall!

Tuesday, September 20, 2011 - Posted by Jullie at 6:11 PM
I must say, this summer felt like it went by super fast! As much as I do not like the hot humid Maryland weather, summer was nice because of it's smell... yes smell... I love the smell of the beach, and cool brisk air at night. So as my farewell to summer, I must reminisce the past few months. These are some pictures from Hawaii trip earlier this year.


 The sweet smell of plumeria flowers

Our new friend born in June right after our vacation =)
college friends reunion in LA
last minute visits to my cousins on the west coast

Summer is also great because it's both me and Mr. Rhee's birthday


And... we also celebrated our 1st Wedding Anniversary this year, we went back to DC for some delicious crab cakes, and went to visit our engagement site: the Jefferson Memorial


The restaurant was right next to the White House, so we took a quick stroll before heading to the memorial.


Although we had a pretty good season, Fall is definitely my favorite season for many reasons:
1.The colors/ fall foliage
2. The indefinite number of pumpkins, apples, and leaves 
3. The cool air, and many different wardrobe options =)
4. The activities...hiking, apple picking, camping, sight seeing, etc..
5. Crafting, I recently just made my fall wreath, hopefully I'll post about it soon!!!
5. THE BAKING! I have so many new fall treats planned, can't wait to try them!


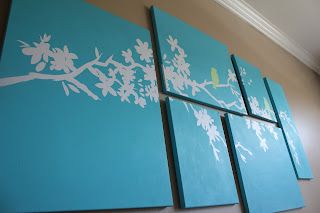
Today, I will leave you with one of my latest craft projects, a new addition to our living room:


I painted these canvas' with a fun aqua blue and mounted a cute wall decal I got from Single Stone Studios.
I wanted a continuing picture, so it was cut into sections, then mounted, and finish!


Now I look back on it, the color may be a little bright for my living room, but it definitely gives a pop of color! On the plus side it matches my leaves & bird theme. Can't wait until the room is complete!

A lot more to post soon, so stay tuned!

Love,
Jullie

Grilled Pizza

Monday, August 29, 2011 - Posted by Jullie at 10:39 PM
Summer is such season for grilling, and since hubby loves to use his new toy I thought maybe we should combine 2 of his favorites: grilling and pizza. We always wanted to grill pizza, I guess that's the natural step after making oven baked stone pizza. So I used my favorite homemade pizza dough recipe from Annie's Eats (here) and combined some favorite pizza toppings. 

Tonight we made 2 pizzas; Chicken Pesto and Margherita.

Chicken pesto pizza:

After the dough is ready I split in half for my two pizzas.


Meanwhile, I made my special pesto sauce and sauteed the marinated chicken.

Then, while the grill is pre-heating, the flour is rolled out onto a large wooden cutting board, generally sprinkled with flour (you may use the counter).
Once the grill is ready, we transferred the pizza dough onto the grill, and toasted on low-medium heat for 2 minutes on one side of the dough. Then, take the crust off the grill and brush on the pesto sauce.


(love those grill marks!)

After you brush on the pesto (on the cooked side), start decorating the pizza with mozarella cheese and chicken spread over the crust. Place the crust back on the grill with the uncooked side facing down and cook for another 8 minutes.
Keep an eye on the grill to make sure you don't burn the crust!

The finished product! 

Margherita Pizza:

same steps as before but instead of pesto we put brushed a little bit of EVOO, then spread the mozarella cheese, sliced tomatoes and fresh basil right before the pizza is ready. 
(hubby doing a fine job of slicing)


And that's it! Super tasty and easy to make!

Hope you get to try it!
-Jullie

Strawberry Cheesecake Tart

Friday, August 12, 2011 - Posted by Jullie at 1:25 PM
One of my favorite desserts of all time is fruit tarts! I made really cute mini fruit tarts for a family dinner last year and I wanted to perfect my tart recipe. So, this may not be my famous fruit tarts, but it's still a tart, has fruit and cream cheese, so what more can you ask in a dessert? It's a great summer dessert, and I shared it with my small group last weekend. Here's the recipe and a cool picture Mr. Rhee took:


Ingredients:
For the crust:
1 large egg yolk
1 tbsp. heavy cream
½ tsp. vanilla extract
1 ¼ cups all-purpose flour, plus more for dusting the work surface
2/3 cup confectioners’ sugar
¼ tsp. salt
8 tbsp. cold unsalted butter, cut into ½-inch cubes
 
For the ganache:
2 oz. bittersweet chocolates
¼ cup heavy cream
1 tbsp. unsalted butter, at room temperature

For the filling:
8 oz. cream cheese, softened
½ cup sifted confectioners’ sugar
½ tsp. vanilla extract
2 tbsp. milk or cream ( I used buttermilk)

For topping:
Fresh strawberries, sliced
Melted bittersweet or semisweet chocolate, for drizzling 

Directions:
To make the tart shell, whisk together the egg yolk, cream and vanilla in a small bowl; set aside.  Mix together the flour, sugar, and salt.   Scatter the butter pieces over the flour mixture. Mix together until it resembles coarse meal, about fifteen 1-second pulses.  With the machine running, add the egg mixture and process until the dough just comes together.  Turn the dough onto a sheet of plastic wrap and press into a 6-inch disc.  Wrap in plastic wrap and refrigerate at least 1 hour or up to 48 hours.

Remove the dough from the refrigerator, make sure it's room temperature before you proceed. Unwrap and roll the dough out on a lightly floured surface to a 13-inch round.  Transfer the dough to a 9-inch tart pan.  Mold the dough to the sides of the tart pan.  Set the dough-lined tart pan on a large plate and freeze for 30 minutes.

Preheat the oven to 375° F.  Set the dough-lined tart pan on a baking sheet, press a 12-inch square of foil into the frozen shell and over the edge, and fill with pie weights.  Bake for 30 minutes, rotating halfway through the baking time.  Remove the foil and weights.  Continue to bake until deep golden brown, 5-8 minutes longer.  Transfer to a wire rack to cool.

To make the ganache, place the chocolate in a heatproof bowl.  Bring the cream to a simmer in a small saucepan.  Remove from the heat and pour over the chocolate.  Let sit 1-2 minutes to melt the chocolate.  Whisk together until a smooth ganache forms.  Spread the ganache in a thin even layer over the bottom of the cooled tart shell.  Allow the ganache to set before proceeding.

To make the filling, beat together the cream cheese and confectioners’ sugar in a bowl on medium-high speed until smooth.  Blend in the vanilla and milk or cream.  Spread the cream cheese mixture over the cooled ganache in the tart shell.

Once finished, decorate with strawberries, and drizzle the remaining ganache over the strawberries into a cool design and enjoy !

(view from the top right after it cooled)

Happy One Year Anniversary!

Sunday, August 7, 2011 - Posted by Jullie at 5:23 PM
Let me first start off by saying, I have a love/hate relationship with surprises. I really do love them when I don't expect it and it turns out to be a lovely surprise, but I hate it when I know something's coming, but have NO IDEA what it is!! =) My hubby is surprising me with dinner tonight, and I wish I knew where we were going!  But regardless, I'm sure I'll love it! I also started defrosting some of our wedding cake from the freezer, not really sure why this is a tradition, but hopefully it'll still be good!

So I guess we're technically not considered newlyweds anymore, but our newlywed year was amazing! As I reflect back on our first year of marriage I can't help to remember all the milestones: the ups and downs of wedding day, our amazing 10 day honeymoon in Fiji, starting out in our small one bedroom apartment, graduating grad school, and buying a house!

 (Hubby at our first resort in Fiji)


To celebrate our wedding anniversary, I'm bringing back a clip from our wedding  thanks to our awesome long time friends at SincereLi Photography.


Jullie + Eugene from SincereLi Photography on Vimeo.


Our wedding day was unforgettable! We loved our funny photographers at JPG, thank you so much for all your hardwork and a memorable photosession! We loved how we could have all of our friends and families in one room at one time! I mean, how often does that happen!

Anyway, Happy Anniversary Eugene! You are truly the greatest gift and I love you soooo much! I'm excited for what's in store for our future!..... and for dinner tonight!